insecure cameras /
Last summer I happened attend a coding meetup, there I actually met Leon Eckert who turns out to also be an ITP student (2nd year)! One of the presenters during the meetup was showing a project he did with insecure cameras pulled from insecam.org. At this point I became really intrigued by the concept and once in NYC, I started looking for cameras in the city.
Most of the cameras happen to be inside buildings. Aside of being a little creepy they are not very interesting to me, this lead me to focus in just a couple of cameras which pointed to the outdoors.
After going through the 100 or so cameras in nyc, I came across two that looked promising, the problem then was that not a lot of information is given about the location of the cameras, except for... well, the camera feed itself.
TRACKING THE LOCATIONS
The first camera I found was actually the one with the cobblestone ground, this actually narrowed down the search significantly since only a couple of streets in ny have this type of pavement.
Looking through the internet, I came across this NYC Bike Maps website that lists all the streets in the city with cobblestone pavements.
http://www.nycbikemaps.com/maps/cobblestones/
After a long virtual walk I finally found that distinctive red building!
Time to go pay a personal visit!
The second camera was a little harder to find but eventually I did.
Also, thanks to Tiri for joining my last minute adventures! and thanks to for capturing some of the images.


Thinking forward, I am not exactly sure what do I want to do with this knowledge, the first thing that comes to mind is a video but there could be other things to explore. Perhaps distance the project from questions of privacy and surveillance and use the cameras a medium to explore something completely different.
In the mean time, here a quick video a couple of friends and I did:
This post was originally posted as an ITP Blog Post
Visual Language W4- Colors in our lives /
For this week's assignment I decided to deviate a little bit from the instructions. Instead of taking pictures and analyzing them for 3 days, I decided to analyze every picture in my pictures folder.
Having more than 1000 pictures this chore had to be automated. I started by writing a processing script to find the average color of a picture, then it will draw vertical lines with that color. An alternative version will later try to sort the pictures by hue, saturation and color.
Here a link to the code.
Results:
unsorted:
sorted by saturation:
sorted by hue:
ya lluegé! /

Form mesh (scan data) to T-splines /
This is meant to be a tutorial on how to convert a mesh (or scan data) into workable T-splines.
You will need a license of Fusion 360 and a license of ReMake (formally Memento) also by Autodesk. You can download the 15 day trial or buy a license (about 200 a year or so), I believe there is also a free version but I am not sure what are the limitations.
Open ReMake and import your mesh. This might take a little depending on how many triangles/points you are working from. In this example I was using a mesh of over 2M triangles, a scan by Bernard Brits I found on GrabCad. I wanted something with complex geometries to really test the workflow and this has it all!
Once the mesh finishes converting, we will go ahead and get it ready for Fusion 360, this might take a while depending on the mesh complexity but here the workflow.
First click on Analyze (the microscope) and select the Detect and fix model issues (the band aid). Detect the issues and fix them all.
Export the mesh:
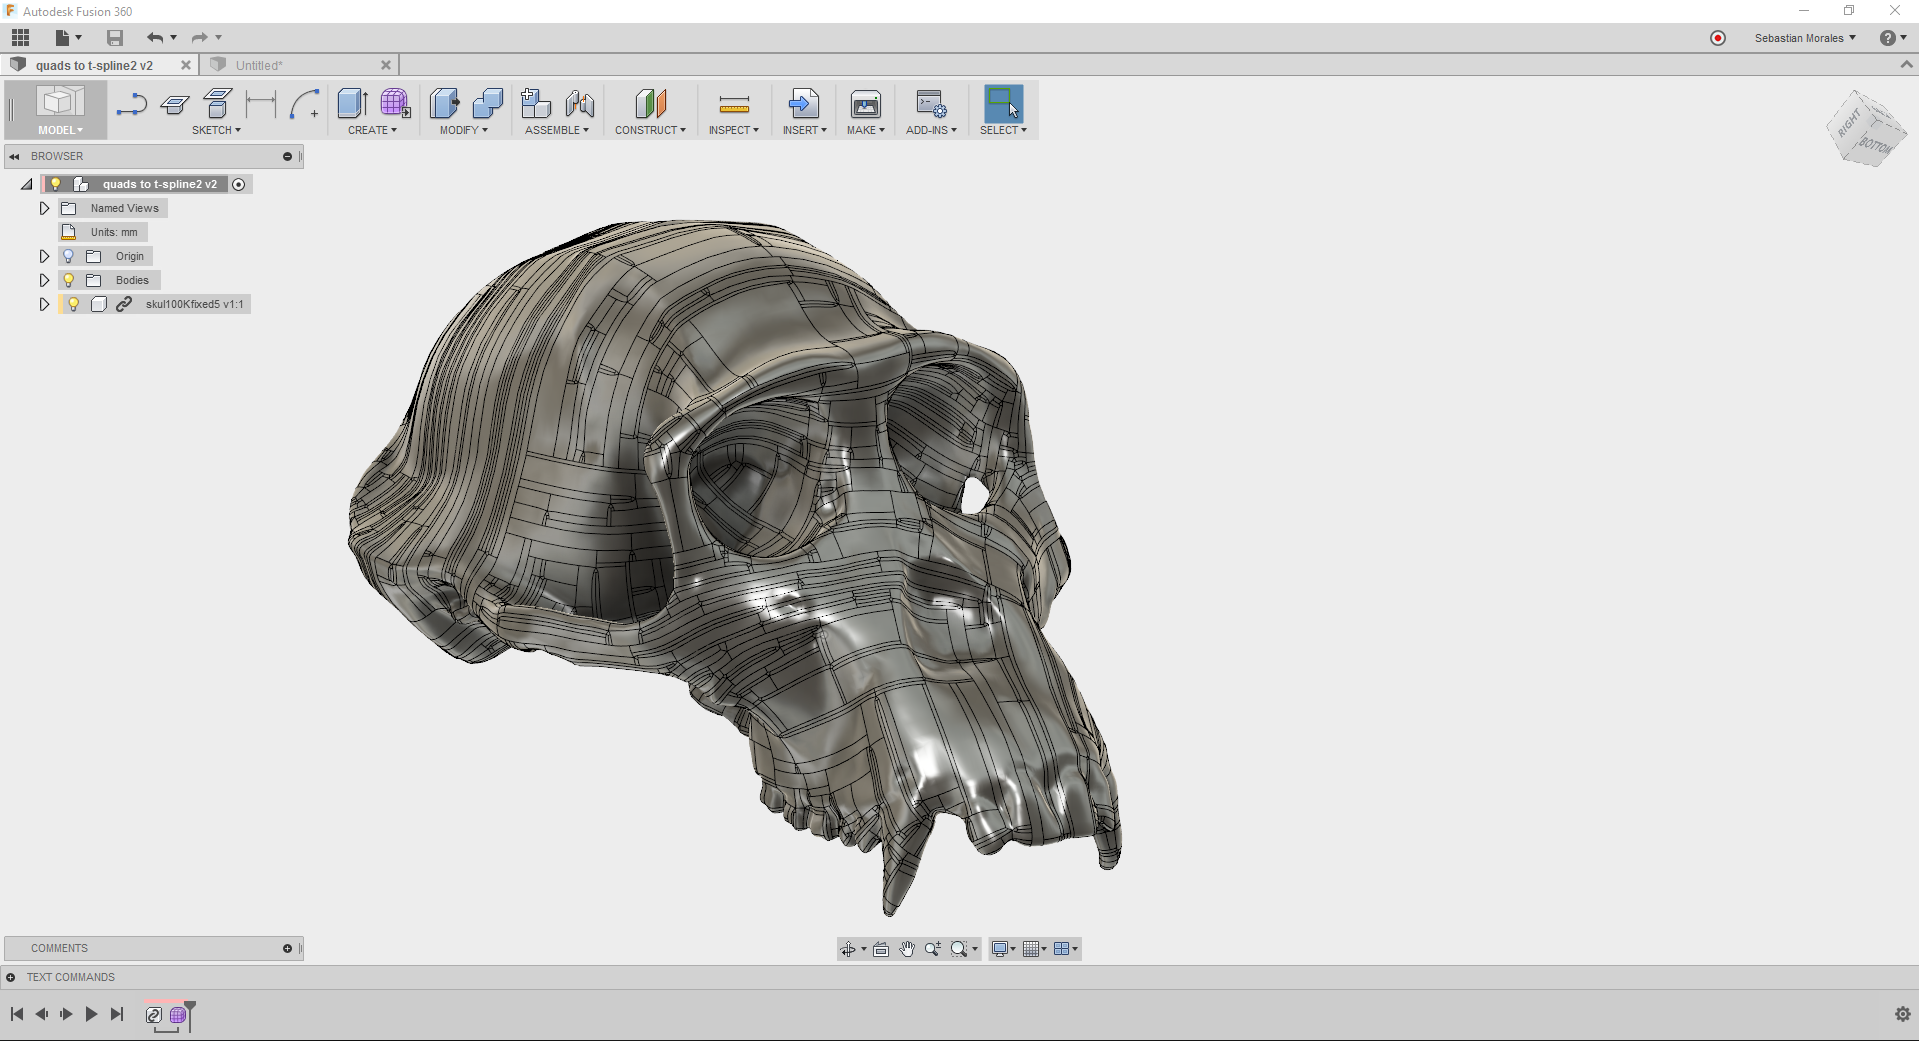
Make sure to select Quads since Fusion will need the Quads in order to make the T-Splines. Select the number of quads depending on your needs, keeping in mind that Fusion will struggle with them later I went ahead and selected 100K.
And you are done! No not really...
Re-import the mesh into ReMake, this time use the quad based mesh you just saved. Repeat the Issue detection workflow and you will see there are a bunch of problems with the mesh.
Once you are done, detect issues AGAIN just to make sure you didn't break anything while fixing it. This happened to me in more than one occasion. You can manually also delete some triangles or disseminate the mesh as needed.
Export the mesh as quads again.
And you are done! No not really...
Import the latest mesh you saved and analyze it. You will notice that there are still some issues. Fix them and export the mesh.
Repeat this until you can't find any issues right after importing the mesh. As you can see from my file name this took about 4 times. This is how you know you are good!
And you are ready for Fusion 360!
Open fusion and Upload your file to the cloud.
Open the drawing and click on Convert from the Utilities on the Sculpting menu.
Select the Mesh and this will convert it from a Quad Mesh to a T-Spline body. This might freeze Fusion for a while (as in a long while) but eventually should create the T-Spline body. Not quite what you need but definitely a step in the right direction.
Once it is finish converting you should have two bodies inside your "Bodies" folder. One of them a mesh, the other the T-spline body.
Click convert again and this time select the T-Spline body, this will convert it into a Brep (a body)! Again, Fusion will freeze for a while but once it is done you are too!
Tangential Dreams/Chek it out!!!! /
Support our installation!
seated woman with bent knee /
more thoughts about fabric, threads and colors
Rotation About an Arbitrary Axis in 3 Dimensions /

Meshing inside of Processing /

Lately I have been doing a lot of work understanding meshes, I realized that it was a personal unexplored frontier that is by no means as scary as I thought it would be.
Here I took a processing sketch I wrote almost a year ago and meshed it inside of processing saving a lot of time if I later wanted to print many of this.
Fixing Bart! /

DEEPART.IO /
Like that time I took a selfie and picasso and degas loved it so much they ended up painting it...
color sounds /
WEBGL /
http://threejs.org/examples/
ProcessingJS + jQuery /
While trying to upload processing sketches, the biggest challenged I am finding is to make it compatible with Squerspace. I found this tutorial by Joseph Harrington where he explains some interactions with processingjs and jQuery. I spent a minute copying the code and a couple of hours making it show here.
Text UI Demo
The Following Sketch was written by Joseph Harrington
A detailed tutorial can be found here: Controlling Processing.js with jQuery UI
VR Renderings /
Processing.js + Squarespace /
UPDATE:
You should take a look at P5.js, you will be surprised!
Original Post:
Click on the Sketch first. Then press:
'S' to save, 'R' to refresh, and 'P' to pause.
Balance between watching art and making it. /
New year's resolutions /
3D/2 Toning /
3D gradients /
Lately I have been playing with 3D gradients in space. With the larger goal of experimenting material gradients in 3D prints.